How close should your fingers be when playing violin music? Violin finger patterns help you learn where to place your fingers on the violin fingerboard. The examples below illustrate some of the basic violin finger patterns.*
How close should your fingers be when playing violin music? Violin finger patterns help you learn where to place your fingers on the violin fingerboard. The examples below illustrate some of the basic violin finger patterns.*
Fun fact: Violin finger patterns and violin fingerboard charts have been used since the early days of violin – as early as 1695 when violin tutors were published such as Nolens volens or You shall learn to Play on the Violin whether you will or no, and Self-Instructor on the Violin; Peter Prelleur’s 1730 The Art of Playing on the Violin; and Robert Crome’s 1741 violin tutor The Fiddle New Model’d. Some of these early violin tutors even encouraged violinists to add frets to the violin with twine to show where the fingers should be placed (Self-instructor on the Violin). Others encouraged beginners to draw ink on the fingerboard (The Art of Playing on the Violin), and later violin methods such as Albert Mitchell’s 1912 The Public School Class Method for the Violin encouraged students to glue a fingerboard diagram on the fingerboard to help beginners know where to place their fingers. Today, many beginning violinists use fingering tape as a temporary aid to help them remember where to place their fingers on the violin fingerboard.
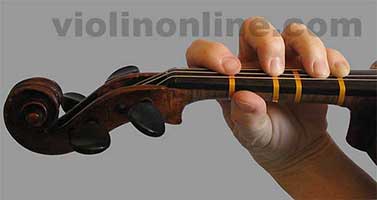
*It doesn’t matter how these finger patterns are numbered or how many there are. Robert Crome used keys, not numbers to arrange his finger patterns and different violin pedagogues have varied ways of numbering and categorizing violin finger patterns (Doflein, Klotman, Bornoff, Gerle, et al). Although the D string is used to illustrate these four finger patterns, finger patterns can be used on any string.
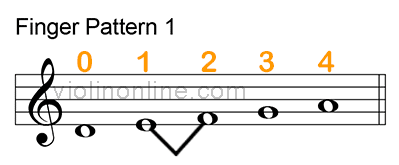
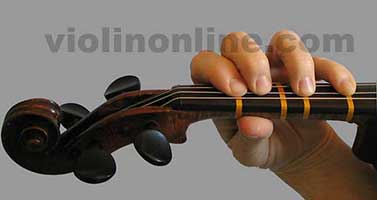
Observe the notes used in Finger Pattern 1: open D, 1st finger E, 2nd finger F, 3rd finger G, and 4th finger A. Notice how the 1st and 2nd fingers are close together because there is a half-step between E and F. Try playing the notes in Finger Pattern 1 by clicking on the link: "Play Finger Pattern 1" sound file.
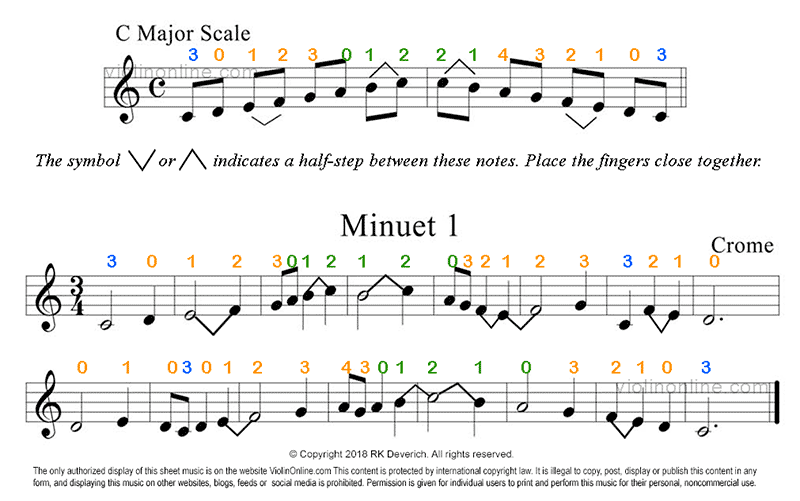
LET'S TRY IT! Play Finger Pattern 1 with the following scale and piece: C Major Scale and Minuet 1. The Minuets used in this Finger Pattern lesson come from a violin tutor written in 1741 by Robert Crome entitled: The Fiddle New Model’d, or a Useful Introduction for the Violin. Visit our Violin Class to learn more about Crome’s Minuets.
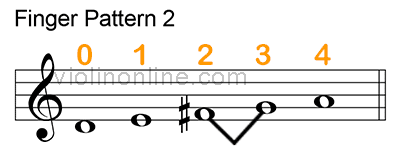
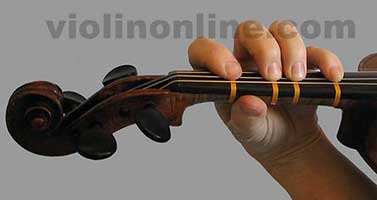
Observe the notes used in Finger Pattern 2: open D, 1st finger E, 2nd finger F#, 3rd finger G, and 4th finger A. Notice how the 2nd and 3rd fingers are close together because there is a half step between F# and G. Try playing the notes in Finger Pattern 2 with the Finger Pattern 2 sound file.
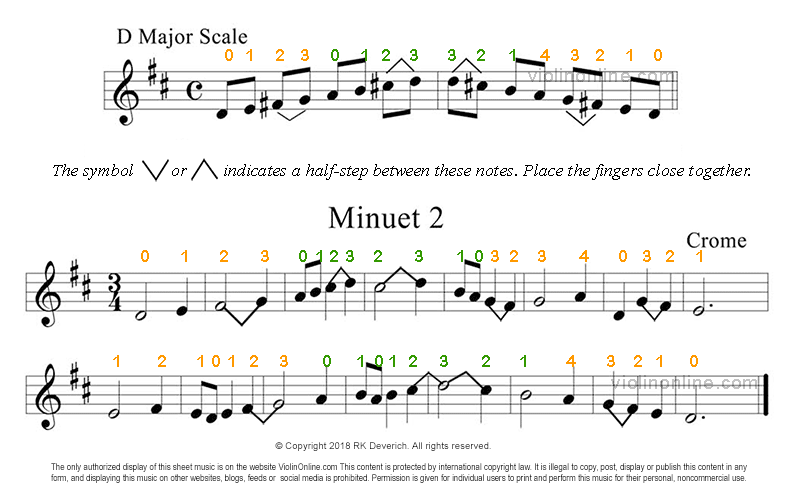
LET'S TRY IT! Play Finger Pattern 2 with the following scale and piece: D Major Scale and Minuet 2. The Minuets used in this Finger Pattern lesson come from a violin tutor written in 1741 by Robert Crome entitled: The Fiddle New Model’d, or a Useful Introduction for the Violin. Visit our Violin Class to learn more about Crome’s Minuets.
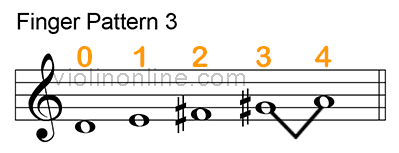
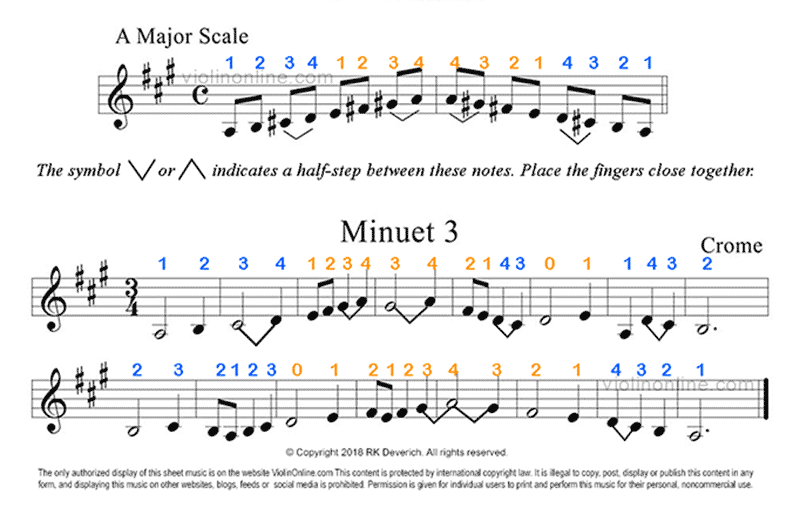
Observe the notes used in Finger pattern 3: open D, 1st finger E, 2nd finger F#, 3rd finger G#, and 4th finger A. Notice how the 3rd and 4th fingers are close together because there is a half step between G# and A. Try playing the notes in Finger Pattern 3 with the Finger Pattern 3 sound file.
LET'S TRY IT! Play Finger Pattern 3 with the following scale and piece: A Major Scale and Minuet 3. The Minuets used in this Finger Pattern lesson come from a violin tutor written in 1741 by Robert Crome entitled: The Fiddle New Model’d, or a Useful Introduction for the Violin. Visit our Violin Class to learn more about Crome’s Minuets.
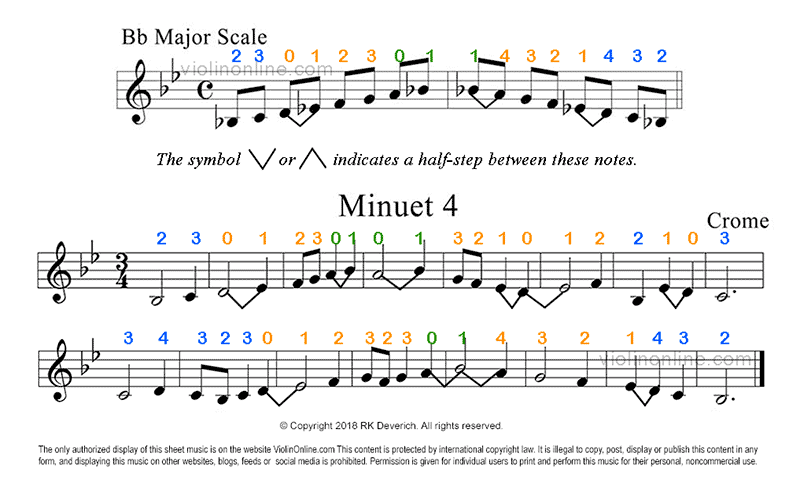
Observe the notes used in Finger Pattern 4: open D, low 1st finger Eb, 2nd finger F, 3rd finger G, and 4th finger A. Did you notice how none of the fingers are close together? That’s because this finger pattern has whole steps between the first, second, third and fourth fingers – there are whole steps between all of the notes. Try playing the notes in Finger Pattern 4 with the Finger Pattern 4 sound file.
LET'S TRY IT! Play Finger Pattern 4 with the following scale and piece: Bb Major Scale and Minuet 4. The Minuets used in this Finger Pattern lesson come from a violin tutor written in 1741 by Robert Crome entitled: The Fiddle New Model’d, or a Useful Introduction for the Violin. Visit our Violin Class to learn more about Crome’s Minuets.
Did you notice how the half step instructions in Minuet 4 below do not include “place the fingers close together?” That’s because this finger pattern has whole steps between the first, second, third and fourth fingers – none of them touch. There are, however, half steps in the music and the half step markings indicate where they are: open D - Eb and open A - Bb. To play these half steps requires a low 1st finger. Minuet 4 and the Bb scale are both in the Key of Bb, and the half-steps between open D and Eb on the D string and the open A and Bb on the A string mean the first finger should be placed close to the end of the fingerboard to play the Eb and Bb notes.
© Copyright 2026 RK Deverich. U.S. Patented. All rights reserved. All rights reserved.