When replacing all of the violin strings or stringing a violin for the first time, violinists generally replace one violin string at a time. Do not remove all of the violin strings at the same time, or the soundpost could collapse.
If for some reason you do need to temporarily remove all four strings, insert a soft, clean cloth between the fingerboard and the body of the violin to prevent the soundpost from collapsing.
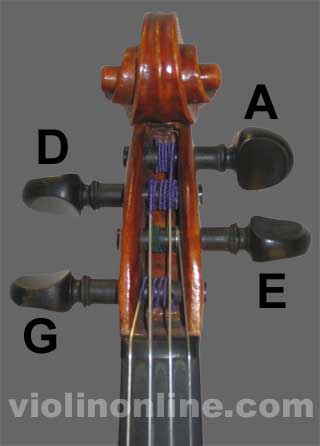
Although the order you replace violin strings isn't critical, many violinists start with the G string and work their way up to the E string.
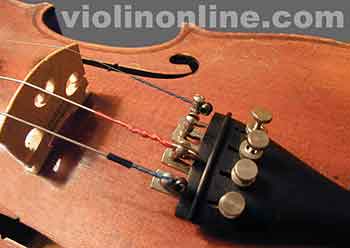
If the violin string you’re installing has a fine tuner, insert the ball or loop end of the string over the tuner cartridge in the tailpiece, and pull the violin string toward the bridge.
If the violin string does not have a fine tuner, insert the ball or knotted end of the string through the tailpiece string hole, tug firmly to make sure the knot or ball is securely in the slot, and pull the violin string toward the bridge. You may need to hold the ball or knot in place with your finger while increasing the tension of the violin string as you turn the peg.
Slightly pull out the peg the violin string will go in until the peg hole is just inside of the pegbox. Thread the end of the violin string through the peg hole, let the violin string slightly protrude, and evenly begin winding it.
Push the peg in as you're turning the violin string to keep the peg from slipping.
Generally, fine tuners are used only on the E string, but beginning violinists often find it useful to have tuners for each violin string.
When replacing all of the violin strings, violinists often tune all of the strings to an approximate correct pitch, then do the fine tuning to get each pitch precisely in tune.
Be aware that when you put on all new violin strings, it will take more adjusting than usual to tune the violin.
If your pegs are slipping or are too tight to securely adjust the strings, you may want to purchase peg compound (also called “peg dope”), an inexpensive commercial product. Visit our stuck or loose pegs section for more ideas.
If you don’t have peg compound and need a temporary quick fix for slipping or tight pegs, you may want to try tips some violin teachers use: for sticking pegs, pull the peg partially out and rub pencil graphite on the sticking part of the peg. For loose pegs, pull the violin peg partially out and rub birthday candle wax on the peg to help it stick. Some teachers recommend chalk to help pegs stick, but chalk is abrasive.
Many violinists find it helpful to have an extra set of violin strings on hand in case a string breaks.
Violin strings can significantly affect the sound of your instrument. You may want to experiment with different brands to determine the sound you like best on your violin.